其实这是第一个实用项目,而且背后的原理不是很难。不过可能因为东西比较多,功能相对完善点吧。
操作是刷卡,如果通过,绿灯亮,蜂鸣器,电机操作。如果失败,红灯亮,蜂鸣器。
核心是一个RFID Card Reader,芯片MFRC522,NXP的。网上有MFRC522的Arduino库,可以直接用。SPI通信。
可以读取到卡号,卡内数据。不过本次为了简单,直接用卡号判断。判断部分不由Arduino直接处理,而是通过串口通信由raspberry pi判断。目的是模拟实际的刷卡系统,Arudino作为IO控制系统,没有直接的网络通信部分,本次由raspberry pi模拟。

Arduino的部分,两个LED灯和蜂鸣器。加上蜂鸣器之后,整体感觉就不太一样。
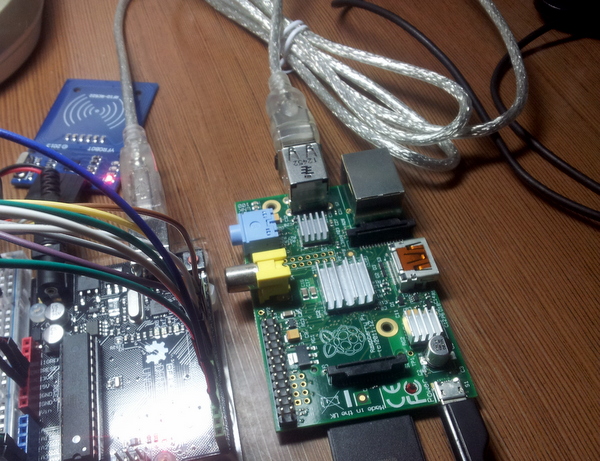
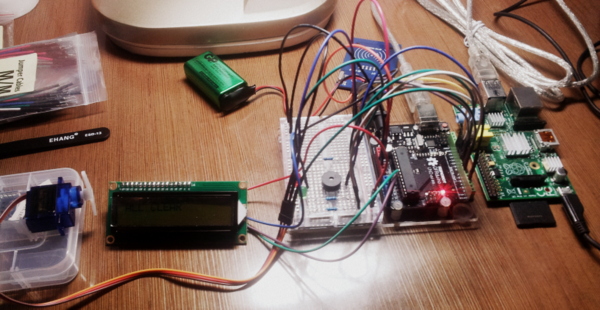
拍得不是很好,坐上角的是MFRC522读卡器。Arduino和Raspberry Pi通过USB串口通信。
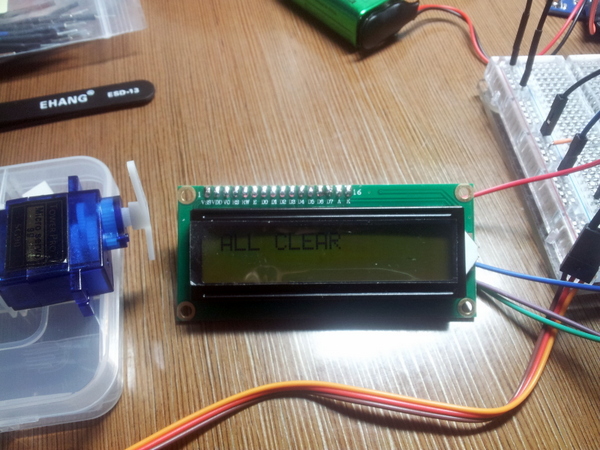
舵机和LCD显示屏,有卡号和通过状态与否的显示。
Raspberry Pi部分的代码不难
import sys
import serial

CARD_IDS = set(['00E1F2A4'])

def determine_device():
	'''
	determine device with command line arguments
	'''
	args = sys.argv
	if len(args) > 1:
		return args[1]
	else:
		return '/dev/ttyACM0'

def loop(s):
	'''
	loop
	'''
	line = s.readline()
	if line and line.startswith('CARD_ID: '):
		card_id = line[9:-1].strip()
		print 'card: [' + card_id + ']'

		if card_id in CARD_IDS:
			print 'passed'
			s.writelines(['T'])
		else:
			print 'failed'
			s.writelines(['F'])

# main function
if __name__ == '__main__':
	# wait 1 second
	s = serial.Serial(determine_device(), 9600, timeout = 1)
	s.open()
	try:
	  while True:
			loop(s)
	except KeyboardInterrupt:
		s.close()
Arduino部分的代码比较多
/******************************
 * DOOR LOCK SYSTEM
 * Author: XnnYygn
 * Date: 2014-10-31
 *
 ******************************
 * PIN data sheet
 * ===========
 * RFRC522 PIN
 *
 * RST    D9
 * SS     D10
 * MOSI   D11
 * MISO   D12
 * SCK    D13
 * ============
 * Servo PIN
 *
 * DATA D6
 * ============
 * LED PIN
 *
 * PASSED(green)   D7
 * FAILED(red)     D8
 * ============
 * BUZZ PIN
 *
 * VCC D3
 * ============
 * LCD I2C PIN
 *
 * SDA A4
 * SCL A5
 * ============
 ******************************
 * Enjoy~
 */

#include <Servo.h>
#include <SPI.h>
#include <MFRC522.h>
#include <Wire.h>
#include <LiquidCrystal_I2C.h>

// SWF stands for STATUS_WAITING_FOR
#define SWF_CARD 0
#define SWF_RESULT 1

#define RFID_SS_PIN 10
#define RFID_RST_PIN 9

#define SERVO_DATA_PIN 6

#define LED_PASSED_PIN 7 // green
#define LED_FAILED_PIN 8 // red

#define BUZZ_PIN 3

////////////////////////////////////////
// variables
////////////////////////////////////////

int workingStatus = SWF_CARD;
int validationResult;

// create MFRC522 controller
MFRC522 mfrc522(RFID_SS_PIN, RFID_RST_PIN);

// servo controller
Servo myServo;

// LCD I2C
LiquidCrystal_I2C lcd(0x27,16,2);

////////////////////////////////////////
// methods
////////////////////////////////////////

void setup() {
  // set serial to 9600, same to raspberry pi pySerial
  Serial.begin(9600);

  // initialize MFRC522
  SPI.begin();
  mfrc522.PCD_Init();

  // initialize servo
  // myServo.attach(SERVO_DATA_PIN);

  // set pin for LEDs
  pinMode(LED_PASSED_PIN, OUTPUT);
  pinMode(LED_FAILED_PIN, OUTPUT);

  // set pin for buzz
  pinMode(BUZZ_PIN, OUTPUT);

  // initialize the lcd
  lcd.init();
  lcd.print("ALL CLEAR!");
}

void loop() {
  switch(workingStatus) {
    case SWF_CARD:
      waitingForCard();
      break;
    case SWF_RESULT:
      waitingForResult();
      break;
  }
}

void waitingForCard() {
  if (!mfrc522.PICC_IsNewCardPresent()) {
    return;
  }
  if ( ! mfrc522.PICC_ReadCardSerial()) {
    return;
  }

  // show card id on LCD
  lcd.backlight();
  lcd.clear();

  // send card id to serial and LCD
  Serial.print("CARD_ID: ");
  for (byte i = 0; i < mfrc522.uid.size; i++) {
    if(mfrc522.uid.uidByte[i] < 0x10) {
      Serial.print("0");
      lcd.print("0");
    }
    Serial.print(mfrc522.uid.uidByte[i], HEX);
    lcd.print(mfrc522.uid.uidByte[i], HEX);
  }
  Serial.println();

  // change working status
  workingStatus = SWF_RESULT;

  mfrc522.PICC_HaltA();
}

void waitingForResult() {
  if(Serial.available()) {
    validationResult = Serial.read();
    Serial.print("VALIDATION RESULT: ");
    Serial.println(validationResult);

    // buzz
    analogWrite(BUZZ_PIN, 128);
    delay(500);
    analogWrite(BUZZ_PIN, LOW);

    // set LCD cursor to next line
    lcd.setCursor(0, 1);

    if(validationResult == 84 /* T */) {
      onValidationPassed();
    } else {
      onValidationFailed();
    }

    // delay 1 second before next operation
    delay(1000);

    // return to init status
    workingStatus = SWF_CARD;
    lcd.noBacklight();
    lcd.clear();
    lcd.print("ALL CLEAR");
  }
}

void onValidationPassed() {
  lcd.print("PASSED");

  // turn on passed LED
  digitalWrite(LED_PASSED_PIN, HIGH);

  // turn servo
  myServo.attach(SERVO_DATA_PIN);
  delay(1000);
  myServo.write(180);
  delay(1000);
  myServo.write(0);
  delay(1000);
  myServo.detach();

  // turn off passed LED
  digitalWrite(LED_PASSED_PIN, LOW);
}

void onValidationFailed() {
  lcd.print("FAILED");

  // turn on failed LED
  digitalWrite(LED_FAILED_PIN, HIGH);
  delay(1000);

  // turn off failed LED
  digitalWrite(LED_FAILED_PIN, LOW);
}
总的来说,这个作品简单但是实用。